In this blog, we will be looking at deploying an application on Kubernetes using infrastructure as code. Describing your infrastructure as code is a good way to build and maintain that infrastructure consistently and securely. There are numerous frameworks available to do this for cloud infrastructure. Some are for multi-cloud usages, like Terraform, others are vendor-specific like CloudFormation (AWS) or ARM (Azure).
For this demo, we will be looking at setting up WordPress on Kubernetes in AWS. Let’s break this down into what we are going to build/deploy:
- AWS infrastructure
- VPC
- Public subnet
- Internet gateway
- Security groups
- EKS on EC2
- Containerized WordPress
In this particular case, it is required to use EKS on EC2. Currently, CloudFormation and CDK don’t support provisioning EFS on Fargate.
Helm
In order to deploy the WordPress container, we will be using a Helm chart. For those not familiar with Helm, I’ll provide a quick rundown. Helm is a tool that is used to manage Kubernetes applications. You can compare it to YUM, the package manager for RedHat. A Helm chart can be used to deploy anything from a very simple one pod application to something very complex consisting out of multiple server applications and databases. There are a lot of Helm charts made publically available for OpenSource projects. For this demo, we will make use of a WordPress chart provided by Bitnami.
AWS Cloud Development Kit
As mentioned before the infrastructure will be coded. As it is on AWS, CloudFormation would make the most sense. However, AWS provides us with another great tool, namely the AWS Cloud Development Kit (CDK). CDK is a programmatic framework that ultimately produces CloudFormation for you and deploys it using stacks. CDK provides basic building blocks that provide you with all the resources required to get things done, and this drastically reduces the number of lines needed to code compared to pure CloudFormation.
Warning
One last thing, the code in this blog is not in any form or shape intended for production environments. To keep the example code clean and easy to follow, aspects like security, availability and maintainability have not been taken into consideration.
The code
Step 1. Initializing the project
I won’t go through the steps of installing CDK; I am assuming you have done so already. Open up your terminal and create a directory where we are going to house this project.
$ mkdir ~/Development/blog/cdk-helm-demo
$ cd ~/Development/blog/cdk-helm-demo
$ cdk init --language typescript
$ npm run build
$ cdk synth
If all is well, you should have output similar to this.
Resources:
CDKMetadata:
Type: AWS::CDK::Metadata
Properties:
Modules: aws-cdk=1.41.0,@aws-cdk/cdk-assets-schema=1.41.0,@aws-cdk/cloud-assembly-schema=1.41.0,@aws-cdk/core=1.41.0,@aws-cdk/cx-api=1.41.0,jsii-runtime=node.js/v14.2.0
Condition: CDKMetadataAvailable
Conditions:
CDKMetadataAvailable:
Fn::Or:
- Fn::Or:
- Fn::Equals:
- Ref: AWS::Region
- ap-east-1 Step 2. Create the VPC
Step 2. Create VPC
For the vpc we need to install the cdk ec2 package. From your terminal run the following:
$ npm install @aws-cdk/aws-ec2
With all this done, we can finally write some code. Open up the directory in your favourite IDE (I use VScode). Open up lib/cdk-helm-demo-stack.ts. To start of with, the VPC is going to be created. It’s going to consist out of 2 subnets, a public and a private one. The snippet below is all that is required to make the VPC and all other required resources.
const vpc = new ec2.Vpc(this, "CDK-HELM-DEMO", {
  cidr: "10.0.0.0/16",
  maxAzs: 3,
  natGateways: 2,
  natGatewaySubnets: {
    subnetName: "Public EKS",
  },
  subnetConfiguration: [
    {
      name: "Public EKS",
      cidrMask: 24,
      subnetType: ec2.SubnetType.PUBLIC,
    },
    {
      name: "Private EKS",
      cidrMask: 24,
      subnetType: ec2.SubnetType.PRIVATE,
    },
  ],
});
Now it’s time to deploy the code. Go to your terminal once more and first build your package, synth it to see the differences, and if you are happy with the outcome, deploy the stack.
$ npm run build
$ cdk synth
$ cdk deploy
If you look at the different resources from the AWS Console, you’ll notice that an Internet Gateway is present. This is one of the niceties of CDK, by declaring a subnet public, the Internet Gateway is automatically created.
Step 3. Create the EKS cluster
With the VPC built, the EKS cluster can be added. The EKS cluster also requires some roles that need to be defined. For EKS and IAM constructs two different modules need to be installed.
$ npm install @aws-cdk/aws-eks @aws-cdk/aws-iam
The lines of code required for a basic EKS cluster are remarkably few.
    const adminRole = new iam.Role(this, "AdminRole", {
      assumedBy: new iam.AccountRootPrincipal(),
    });

    const eksRole = new iam.Role(this, "eksRole", {
      roleName: "eksRole",
      assumedBy: new iam.ServicePrincipal("eks.amazonaws.com"),
    });

    eksRole.addManagedPolicy(iam.ManagedPolicy.fromAwsManagedPolicyName("AmazonEKSServicePolicy"));
    eksRole.addManagedPolicy(iam.ManagedPolicy.fromAwsManagedPolicyName("AmazonEKSClusterPolicy"));

    const cluster = new eks.Cluster(this, "MyCluster", {
      version: eks.KubernetesVersion.V1_17,
      vpc: vpc,
      mastersRole: adminRole,
      role: eksRole,
    });
If you wish to use a version of EKS that isn’t available in CDK yet, you can always create a version from a string like so.
version: eks.KubernetesVersion.of("1.18")
Now that we have a cluster, we can add the helm chart. As mentioned before, for this demo I chose the Bitname WordPress helm chart. The chart comes with a lot of configurable options. For this demo, I’ll only modify a few, like the blog’s name, the username and the password.
    cluster.addChart("wordpress", {
      repository: "https://charts.bitnami.com/bitnami",
      chart: "wordpress",
      release: "wp-demo",
      namespace: "wordpress",
      values: {
        wordpressBlogName: "My demo blog.",
        wordpressFirstName: "Emiel",
        wordpressLastName: "Kremers",
        wordpressUsername: "demo",
        wordpressPassword: "Welc0me",
      },
    });
Admittedly, if you have a large number of values to configure, defining them all in your CDK will result in cluttered code. You might want to store the values in a separate file.
With the addition of this code, our cluster and chart are ready to be built and deployed. When all is done, your output should be similar to this
CdkHelmDemoStack

Outputs:
CdkHelmDemoStack.MyClusterConfigCommand57F2C98B = aws eks update-kubeconfig --name MyCluster8AD82BF8-9c487297164043408f0a26ac740b8e93 --region eu-west-1 --role-arn arn:aws:iam::019183386637:role/CdkHelmDemoStack-AdminRole38563C57-BHV5XN2LTME6
CdkHelmDemoStack.VPCid = vpc-0c20fef7c4855b6b7
CdkHelmDemoStack.MyClusterGetTokenCommand6DD6BED9 = aws eks get-token --cluster-name MyCluster8AD82BF8-9c487297164043408f0a26ac740b8e93 --region eu-west-1 --role-arn arn:aws:iam::019183386637:role/CdkHelmDemoStack-AdminRole38563C57-BHV5XN2LTME6
CdkHelmDemoStack.Clustername = MyCluster8AD82BF8-9c487297164043408f0a26ac740b8e93

Stack ARN:
arn:aws:cloudformation:eu-west-1:019183386637:stack/CdkHelmDemoStack/58708d90-e4bb-11ea-a041-0aac2484be2a
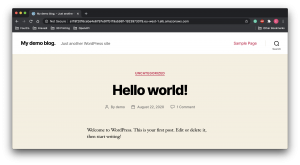
The output provides the command to update the kubectl config. After running it, request the services to get the hostname attached to your installation. Copy the URL mentioned in the External-IP and paste it into your browser to see the end result of your deployment.
$ kubectl get -n wordpress svc
NAME                TYPE           CLUSTER-IP      EXTERNAL-IP                                                               PORT(S)                      AGE
wp-demo-mariadb     ClusterIP      172.20.17.116                                                                       3306/TCP                     21h
wp-demo-wordpress   LoadBalancer   172.20.63.71    a119f20f6ceba4e6797e97fb119ab98f-1923973079.eu-west-1.elb.amazonaws.com   80:31320/TCP,443:31989/TCP   21h
Finally
There you have it. A WordPress blog deployed using CDK and Helm. All the code is available from this git repo. There will be a second part to this series, where instead of using the default ingress controller, the AWS ALB Ingress Controller and External DNS will be used.
TIP
Whilst developing it’s generally a good idea to first deploy the EKS cluster, once that’s done deploy your charts. The EKS cluster can take a long time to deploy and an equally long time to destroy. If you deploy EKS and your chart in a single run and your chart fails, it will roll back the entire run. You’ll end up wasting a lot of time waiting for your cluster to be destroyed and rebuilt in your next attempt. If you deploy your cluster successfully and in a subsequent deployment your chart fails, only your chart rolls back, and your cluster is kept.
TIP
By default, the chart also creates a database pod. When you uninstall the chart, the PVC that comes with the database pod does not get destroyed. Any subsequent deployments of the chart fail because it can’t complete the new claim. You have to delete the PVC by hand.
TIP
There is one more oddity with this setup. When you destroy the entire stack, more often than not deletion of all resources fails. This is because the elastic IP associated with the load balancer does not get removed properly. If you find yourself in this situation, manually destroy the elastic IP, and you can finish deleting the entire stack.


